What is PVC Membrane Foil ?

What is PVC Membrane Foil

You might have wondered what is PVC membrane foil. This eco-friendly decorative finish is resistant to chemical decay, shock, and weather conditions. In this article, we’ll discuss the features and benefits of PVC membrane foil. Let’s begin with a look at how it works. If you’re interested in using it in your home, here are a few tips:

PVC membrane foil is an eco-friendly decorative finish

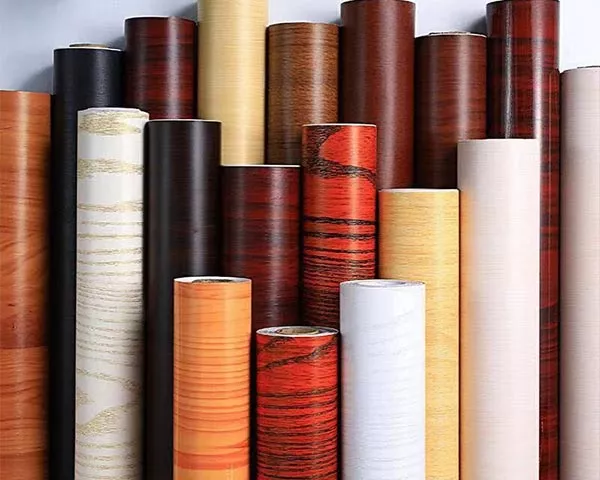
If you’re looking for a beautiful, durable, and environmentally-friendly decorative finish for your outdoor furniture, PVC membrane foil is the perfect solution. PVC membrane foils can be used to protect outdoor furniture from harmful UV rays, extending its life significantly. This environmentally-friendly decorative finish will not disappoint your clients. PVDF film is another option for exterior decoration projects. Depending on the thickness, PVC membrane foils are available in various colors and patterns. Usually, PVC membrane foil comes in thicknesses of 0.12mm up to 0.5mm. The most common thicknesses for wrapping are 0.18mm, 0.5mm, and 0.12mm.

When selecting PVC membrane foil, make sure to select the appropriate foil for the material you are covering. Different materials require different types of PVC membrane foils. If you’re covering plywood or MDF cabinets, use vacuum pressing or laminating. Otherwise, PVC membrane foils will not adhere evenly to rough surfaces. To protect the environment, you’ll want to choose a foil that’s not too shiny or too rough.

It is resistant to weather conditions

PVC membrane foil is made from a durable material. Generally, it is black in color and offers excellent thermal insulation. This material is also highly resistant to weather conditions, including rain, snow and ice. This type of foil can be used to insulate floor heating systems. It is also resistant to wind and weather conditions and is highly tear-resistant. For more information, contact Xinxin. This manufacturer specializes in manufacturing PVC membrane foils.

PVC membrane foils are available in varying colors and thicknesses. They can be made with decorative patterns or wood grains, as well as solid colors. These foils have a high degree of weather resistance, making them an excellent choice for exterior decorating projects. Typical PVC membrane foil thicknesses range from 0.12mm to 0.5mm, and many types are available with multiple colors and patterns. They are also resistant to moisture and fire.

It is resistant to chemical decay

Its superior chemical resistance is a crucial factor in a wide range of applications. PVC membrane foil is used for a variety of applications, including indoor and outdoor window and door coverings. However, it must be treated properly to withstand the ravages of time and chemical decay. Here are some tips to prevent PVC membrane foil from fading:

Choose the right application for PVC membrane foil. The foil should not stick to rough or contaminated surfaces. It should also be used on the intended material. If a surface is too rough or contaminated, it won’t adhere evenly. To use PVC membrane foils, first determine what application you’re going to use it for. You can choose vacuum-pressing or laminating. Then, follow a comprehensive guideline for removing PVC membrane foils.

It is resistant to shock and wear

The properties of PVC membrane foil include a high degree of elasticity and shock resistance. Unlike metals, PVC is more durable and resistant to shock and wear than steel. PVC membrane foil can be made into various models, including doors. These can also be coated with a protective layer to prevent damage from shocks and scratches. The most common PVC membrane foil is polyvinyl chloride.

PVC membrane foil is also available in a wide variety of colors and thicknesses, including wood grains, stone, and marble. The most common thickness is 0.18mm. This material can be a decorative finishing material for doors and furniture. Depending on the thickness, the PVC membrane foil can be used for a variety of applications. In addition to being resistant to shock and wear, PVC membrane foil is also fire-resistant and weatherproof.

It has no white edges

If you’re looking for a way to protect exterior surfaces and outdoor furniture from the sun, PVC membrane foil is a great choice. They’re economical and offer a uniform look and feel. The best thing about these laminates is that they’re UV-protective, so your clients won’t be disappointed. PVDF film is another option for exterior decoration projects. When choosing the right PVC membrane foil for your project, remember that the best type of adhesive is the one that has the highest degree of protection.

High-end PVC membrane foils are ideal for furniture because they have no white edges. These decorative finishes are available in different thicknesses, including 0.18mm and 0.5mm. They can have decorative patterns, such as wood grain, marble or stone, as well as solid colors. The thickness of PVC membrane foils varies from 0.12mm to 0.5mm, with 0.18mm being the most common. PVC membrane foils are also suitable for door and window coverings.

How to Use Iron on Edge Banding

How to Use Iron on Edge Banding


If you’re thinking about applying edge banding to a tabletop, you may be wondering how to go about it. There are some essential tips and tricks to remember, such as choosing the right tool and material, as well as adhering the edge band properly. You’ll also learn about how to maintain the durability of your finished project. Hopefully, these tips and tricks will help you learn how to use iron on-edge banding.

Tools

There are various tools for iron on-edge banding. Small irons work well for small projects, such as installing edge banding on cabinets. Larger irons are better suited for larger projects. A small iron, such as the WoodRiver, is not advisable for large pieces of furniture. A large iron, however, covers a much wider area and requires less pressing down. It also does not require flat objects or rollers.

A portable iron is another handy tool for edge banding. The Yodean Decor Veneer Edge Banding and Sealing Iron is lightweight and convenient for use on many different types of projects. This iron features an auto-cleaning system and temperature control dial. It is also equipped with a 360-degree swivel cord to allow you to easily maneuver around and use it efficiently. You can even use the iron for other applications as well, such as sealing plastic.

Techniques

There are a few different techniques you can use to apply iron-on edge banding. It is important to plan ahead in order to avoid visible joints and to minimize the amount of time you need to apply it. Once you have positioned the strip, turn on your iron and heat it for about four to six inches. This will help the adhesive cool down and make it easier to apply the strip. Move the iron along the edge and apply downward pressure to the banding.

Before applying the edge banding, remove any loose material. Make sure the wood is as level as possible and that the edge of the plywood is flat. You should also use a hot iron for maximum results. Heat the wood until the glue adheres. The wood should be warm, otherwise, it will cause a bumpy finish. Once the glue has set, trim the edges of the wood to fit. Once you’ve trimmed the edge banding, you can apply another coat of glue to ensure that it adheres properly.

Material

If you’re looking for a more affordable and convenient way to finish a project, consider installing iron on edge banding. Although this method does require some preparation, it doesn’t require specialized tools or glue. To apply this technique, you can purchase an iron in the right size for your project. To apply the strip, begin by locating the edge band with your hand and pressing it with the iron. Apply pressure with the iron, letting it cool for 1 minute after each pass. After this, use a utility knife to trim the excess material.

Use a low-cost iron for this task. A regular clothes iron may get sticky and cause damage to the soleplate. You can purchase a cheap iron at a discount retailer or thrift store. Be sure to use the cotton heat setting on your iron. Next, cut the edge banding so that it extends one inch past the edge of the piece. Make sure that the overhangs on each side of the edge banding are equal. Set the iron at one end of the edge banding. Move the iron in a slow, steady pace so that it does not scorch the material.

Durability

The final step in installing iron on edge banding is to make sure that it adheres to the plywood’s edge. While regular clothes irons may get adhesive on the soleplate, you should buy a low-cost iron designed for use on fabrics and use the cotton heat setting. Start at one end of the plywood edge banding and move the iron slowly across it, making sure to keep the edges level. Once the adhesive cools, trim the excess banding.

A high-quality iron on edge banding will withstand a lot of abuse. While some people may wonder whether an iron on edge banding is really as durable as it is advertised to be, you can be sure that this material will last for years. And if you are concerned about the appearance of the edge banding, you can opt for wood veneer edge banding, which is a high-quality veneer that is applied to the edges of plywood. The veneered edge banding is an excellent choice if you want to give your plywood a solid-wood look. The edge banding will not only give your plywood a nice finish, it will also protect the inner layers from damage.

Application

Applying iron on edge banding is easy and should not leave a visible joint. Before starting, prepare the area in which the edge banding will be applied. Make sure the area is well-ventilated. For the best results, position the banding with one hand and heat the iron. Apply heat to 4 to 6 inches of banding first. Let the adhesive cool for about one minute. Apply downward pressure while moving the iron over the edge banding.

For the best results, use the recommended edge banding iron. Some edge banding materials are hard to find. If this is the case, consider making your own. You can use scissors, a veneer saw, hot melt adhesive and a clothes iron to create the desired look. Applying edge banding can take some time, but is well worth the end result. Once you have your edge banding applied, you can apply conventional wood finishing products.

How to Cut Edge Banding and Apply It to Plywood

How to Cut Edge Banding and Apply It to Plywood

This article will discuss how to cut edge banding and how to apply it to plywood. Once you have edge banding installed, you can proceed to trim it by using a block plane and sandpaper. Be careful not to cut towards the banding, as this can loosen it and leave it unapplied. Use the sandpaper to reach inside corners. Now, you can apply the banding to your plywood.

Gluing edge banding

If you’re planning to use glue on your edgebanding project, you should follow some simple tips. To ensure that your edgebanding adheres well, make sure that you have enough glue applied to the banding. The glue should cover the entire width of the banding. If it doesn’t, here are some reasons why it might not stick properly. If you’re doing it by hand, you should follow the instructions on the packaging carefully to prevent bubbles or gaps.

Trimming excess edge banding

If you want to improve the appearance of your home’s furniture, you should know how to trim the excess edge banding. To achieve this, it is necessary to have a finely shaped woodwork and sharp edges. Although edge banding trimmers are generally used by professionals, you can learn how to use one to achieve the same effect. Here are some tips to follow:

Trimming overhanging edges

Trimming overhanging edges flush with the plywood surface is difficult if the veneer is thin. To prevent tearing, use a trimmer with edge banding and shimming on both cutting sides to ensure that the blades don’t cut through the veneer too deep. To avoid deep cuts, use an iron to add shims to the edges of the trimmer. It’s important to leave a gap where the blades meet.

Applying edge banding to plywood

If you have ever built something out of plywood, you might have wondered if edge banding would be worth it. While the material is a great choice for cabinets, boxes, and shelves, a raw plywood edge can take away from the excitement of finishing the project. Edge banding prevents this problem and makes plywood look like a solid piece of wood. There are a few steps to applying this type of finish, but the benefits are worth it.

Using a router bit set

An Edge Banding router bit set allows you to create the look of real hardwood edge bands on your woodworking projects. This set works on a variety of materials, including plywood, particle board, MDF, and hardwood stock. The bit must be centered on the stock to ensure a precise fit. Typically, these bits are 3/4″ to 1″ thick and will cut a flush edge band.

Using a table saw

There are two basic methods of cutting edge banding on a table saw. The first is the v-groove method, which uses a v-shaped bit in combination with a specialized router bit set. This method is more effective because it produces a smooth and strong joint. While the v-groove joint is stronger than iron on veneer, this method is less accurate. Using a v-groove bit makes the process easier.

Using an edge banding trimmer

An edge banding trimmer can quickly and easily cut edge banding. With four carbon steel cutting edges, this trimmer cuts both edges in one pass. Unlike traditional trimmers, which use springs to cut in a single direction, the edge banding trimmer can cut multiple layers of edge banding in one pass. It is ergonomically designed to allow you to easily reach tight corners and edges.

Tips To Buy Edge Banding Tapes


Tips To Buy Edge Banding Tapes
Why do you need edge banding? Well, it is not only aesthetically pleasing, but also helps cover up the exposed edge of your boards that contacts plywood, mdf, If you have never considered edge banding before, read this article. It will teach you how this simple yet effective technique works. Read on to discover why wood grain edge banding is so popular. You’ll be glad you did. Here are some reasons why it is the perfect solution for your woodworking project.

PVC Edge Banding Tape

Edge banding is an inexpensive, flexible, and easy to install edge trim. It is made from veneer with a paper backing. It is typically best suited for large surfaces with rounded edges, and is usually 25mm wide. There are many different types and thicknesses of edge banding available. You can choose from wood species, colors, and thicknesses to suit your needs. In addition, edge banding is easily removable for cleaning and reapplication.

Polypropylene is a completely neutral synthetic material, which means it is fully recyclable and odorless. It also has the same ph level as a candle, making it suitable for use in food preparation environments. Additionally, it offers greater flexibility and chemical resistance, making it ideal for household applications. It can be applied to curved furniture components, such as drawer fronts. Polypropylene requires specific scrapers to remove excess edge banding.

ABS Edge Banding

If you’re in the market for a new edge banding material, ABS is a good choice. This durable plastic is 100% recyclable, making it a great option for companies that care about the environment or those looking to minimize their environmental impact. This abs edging is also a great option for any project where health and safety are top priorities. Here are some reasons why ABS edge banding is an excellent choice. They’re also 100% biodegradable, so you don’t have to worry about any harmful by-products.

ABS edge banding is flexible and can be applied to any curve, as well as any radius. Its chemical and detergent resistance makes it a great choice for a variety of applications, including furniture. The material is available in an infinite number of colours and surface finishes, and there are multiple widths to suit any project. Because ABS is available in different thicknesses, it’s easy to design the right edge banding for your project.

Reconstituted Veneer Edge Banding

If you’re looking for a unique way to accent your cabinets, reconstituted veneer wood grain edge banding might be the right choice for your next project. Unlike traditional wood veneer, reconstituted veneers are consistent in color and grain, so you won’t have to worry about matching and cutting to get a perfect match. These veneers also come in a variety of wood species, including white oak, red oak, ash, teak, zebrawood, maple, and elm.

The process of applying reconstituted veneer glue is similar to that of installing a natural veneer. It involves applying ureic glue with a pressure of 1.5 to 3 bars, and the temperature ranges from 80 to 125 degrees Celsius. It is important to remember that the glue used in veneering is not for human consumption, as it is toxic. Reconstituted veneers should also be sealed with a UV-protecting oil to maintain the color.

Melamine Edge Banding

If you want to create a professional-looking cabinet with simulated wood grain, you can use a melamine edge banding. The material’s plastic finish will fool the eye, but it’s more durable than solid wood. If you’re building a kitchen or bathroom cabinet, it may be better to choose a solid wood edge banding. The edge banding can be purchased at a home center or hardware store for about $20.

There are several types of melamine edge banding. You can find a pre-glued version in common widths, or you can order it unbacked. There are also pre-glued edgebandings for applications that require no glue. Unbacked rolls of melamine edge banding are generally 7/8″ wide and 500 feet long. They are an attractive choice for cabinetry. They’re not ideal for high-use environments, but they do provide a clean, solid wood look.

How To Choose Melamine Edge Banding?

How to Choose Melamine Edge Banding?

If you’re looking for a durable, flexible, and easy-to-apply edge banding, you’ve come to the right place. In this article, we’ll explain how to install and trim this durable, flexible edge banding. Regardless of your budget, you can be sure that melamine edge banding will serve your needs. Here are some of the most important things to consider before deciding on this product:

Durable

Durable melamine edge banding is a great way to finish off your cabinets, countertops, and other melamine surfaces. Unlike other edgebanding materials, melamine is completely water-resistant and UV-resistant. It is extremely durable and long-lasting. The edgebanding itself comes in basic colors, but there are also many colors and woodgrains to choose from. Some edgebanding is made of polyester, but there is a subtle difference between melamine and polyester.

Melamine edgebanding comes in several types, including pre-glued and adhesive-backed materials. Both types provide a smooth, finished appearance and are typically the most affordable option. However, for commercial and custom applications, soft melamine edgebanding is a great choice. It provides more flexibility and strength, and can sit smoothly on curved surfaces. This type of edgebanding is not only affordable, but it also provides a professional-looking finish to your cabinets.

Flexible

If you’re looking for durable and flexible edge banding for kitchen and bathroom cabinets, you can order high-gloss melamine edgebanding. This material is also known as acrylic panels and comes in pre-glued rolls. These edgebandings offer a high-gloss finish without sacrificing durability or price. The high-gloss finish of these edgings makes them popular for both residential and commercial applications.

Flexible melamine edge banding is a great way to cover rough edges without the need for adhesives. It is easy to install and offers excellent protection for your furniture. This material comes in a variety of colors and shades, and it can be custom-cut to meet your specific specifications. It also comes in wood grain patterns, which can work well with various interior decors. It’s also very durable and compatible with most kinds of furniture.

The advantages of flexible melamine edge banding over other types include ease of application and accuracy. This material comes pre-glued or heat-activated. It is available in a wide variety of colors, including solids, woodgrains, and patterns. Its flexibility also makes it perfect for curved and rounded surfaces. It can be applied to many different surfaces, including wood, metal, and plastic. This type of edge banding is available in rolls of 50 to 250 feet, and can be easily applied with a household iron.

Easy to apply

Easy to apply melamine edge banding has become a popular option for homeowners looking to give their cabinets an extra touch of class. The melamine-based edgebanding is a sealant that is resistant to high temperatures, UV exposure, and water. This durable edgebanding will last for years. While most melamine edgebanding comes in basic colors, you can choose from a wide variety of woodgrains and other designs. Some edgebanding is polyester-based, but the differences are not substantial.

To apply melamine edge banding, you’ll need a clean surface that is free of dust. The edging is available in a variety of sizes, but it is recommended to order square pieces that are 7/8″ wide. You can also use a hot air edge bander to apply it to a smooth surface. To help level uneven surfaces, use coarse-threaded screws. You can purchase these screws in a range of sizes, including 12, 15, 18 and 25mm.

Easy to trim

The edge banding is made of melamine and can be easily applied to a clean surface. Melamine edging is 7/8″ wide and comes in a square format. You can use a hot air edge bander to apply it to your project. You may also use coarse-threaded screws to level uneven surfaces. You can find them in sizes of 12, 15, 18, and 25mm. It is not necessary to sand the edges to make them even.

For a seamless look, melamine edge banding has a smooth, durable finish that is resistant to UV exposure, moisture, and high temperatures. It is also easy to apply and trim, making it ideal for many projects. Glue up is easier as there are no sharp edges to worry about. This edge banding is easy to apply and trim and doesn’t require a professional sander.

Decorative Paper For Furniture

Tips to Choose Decorative Paper For Furniture
There are different types of decorative paper available for furniture. You can choose from ornate papers, painted decor papers, PU decorative foil paper, and wood contact paper. Read this article to find out more. We have listed the different types of decorative papers and the different types of furniture they are ideal for. The following are a few tips for choosing the right type for your home. And don’t forget to experiment with the different options!


Ornate paper

Decorative paper for furniture is made with patterns and colors printed on its surface. Typically, ornate papers are applied to the veneer of plywood, particleboard, or MDF. These papers do not require painting after the adhesive is applied, and can be applied to both vertical and horizontal surfaces. However, they are not appropriate for use as flooring paper. Listed below are some characteristics to consider when choosing ornate paper for furniture.

Decorative paper is available in many colors. The color of the decorative paper must match that of the surrounding wood, for example. You can find wood grain patterns in different shades of light and dark, so be sure to match the color scheme. If you have a lot of dark furniture in your home, you might want to use both light and dark colors of the same pattern. This will make the room appear brighter and more comfortable.

Painted decor paper

If you’ve been thinking about painting your furniture, you’ve probably already heard of paint decoupage papers. These specialty papers have excellent properties for decorative printing and a large selection of colors and textures. They come in many different sizes and styles, and can fit virtually any style. Whether you want a new look for your dining room table or a new look for your living room sofa, you can find a paint decoupage paper that matches your decor.

PU decorative foil paper

PU decorative foil paper is an improvement of traditional wallpaper and wood-like surfaces for furniture and panel frames. This paper is waterproof, scratch-resistant, and can be painted to enhance brightness. The process of PU coating on the surface of the paper is environmentally friendly, making it a perfect choice for the living and working environment. The PU decorative foil paper is available in different weight-based materials, each with its own hardener.

PU coated paper features a high gloss surface and is suitable for cold lamination. It can also be used for printing 3D visual/tactile effects. Its thick paper backing is very stable and does not flake when folded. Thin sheets of gold leaf can be used to decorate furniture or craft projects. If you’re looking for an alternative to metal, consider using PU decorative foil paper for your projects.

Wood contact paper

You can easily change the look of your wooden furniture by applying contact paper. You will need to prepare the surface properly. Make sure that the surface is clean and dry before applying the contact paper. If the surface is not clean, you can use scraper to remove the contact paper. You must ensure that you have cleaned the wood properly, otherwise it can damage the contact paper. You can use contact paper on different types of furniture. Here are some tips to change the look of your wood furniture.

Clean your wood before applying contact paper. It must be sanded smooth, so that the contact paper will stick. You can use a roller to remove trapped air bubbles. If the surface is not smooth, you can use a rag to make it smoother. When applying the contact paper, take care to clean the wood properly and apply the adhesive to the surface evenly. Remember that the contact paper is very tough; if you accidentally remove it, you will leave a residue.

what is laminate paper for furniture?

what is laminate paper for furniture

Laminated paper for furniture is a common and versatile surface material. It can be used in different applications and comes in a variety of colours and patterns. The process of using laminated paper involves bonding decorative papers to a substrate, usually particleboard or fiberboard. The resulting sheet is usually quite stiff. The finished product can then be used to make anything from tables to chairs. Here are some tips to use laminated paper for furniture.

Use the highest-density laminate sheets that pass strict tests for off-gassing. Try to find a low-VOC contact adhesive for the glue. If the particleboard base contains urea-formaldehyde glue, look for a non-urea-formaldehyde option. You can also try Wilsonart’s line, which contains 20 percent recycled content. If you are using a thermoplastic laminate, look for one with a 100 percent recycled particleboard. Choose FSC-certified particleboard if you can.

How to laminate paper yourself

When using laminated paper for furniture, you should select the product that has the highest durability. While it is not necessary to choose a high-quality laminate, you should always choose one that comes with a warranty. Many manufacturers have a guarantee on their laminated furniture, so you can be assured of their quality. Ensure that you check out the safety guidelines of laminated paper for your furniture. You should also be sure to read the manufacturer’s instructions to make sure the product is safe for children.

Laminate sheets are easy to apply. You can buy them from online stores. Once you’ve purchased them, you’ll need to iron them on the substrate. Melamine has a similar effect to veneer, except that it is less shock-absorbing. Lastly, you’ll need to know how to install them properly. In order to make sure that they are secure, you should make sure they adhere well to the substrate.

When selecting laminated paper for your furniture, you should consider the quality of the material. Typically, laminated wood is less durable than veneer. The melamine used for laminated wood is not as versatile as solid wood, and it won’t stain or paint as easily. Furthermore, the materials used for laminated furniture may be too fragile for children to use them. Therefore, it’s recommended to check the safety standards of the materials before you use them for furniture.


In addition to furniture, you should also consider the type of laminate used for the countertop. In general, laminated paper is a more durable option than solid wood. Unlike veneer, it doesn’t need any finishing. It can be used to make a countertop with laminated paper. It’s also a good choice for countertops. They can withstand heat well. In addition to the cost, it will not be damaged by hot pots.